Why will knowing how to play your primary chords boost your confidence quickly? My decades of experience as a piano coach have made it clear to me that the majority of piano beginners want the shortest path to immediate results possible. This is understandable since even small successes breed further enthusiasm and interest. So what’s the best way to go?
Well, there is more than one option, of course. That said, it is my perspective that if you can get a handle on just a few of the most often used chords, the fun you can have with them can have you enjoying many hours at that piano or keyboard of yours.
Here’s How To Know What They Are
So, what are the chords used most often? Well, quite simply they are the the chords that are built on the first, fourth, and fifth degrees of a given scale. Let’s look at the note names in the key of C Major:
C D E F G A B C
The first, fourth, and fifth notes (or degrees) in this scale are C, F, and G. We use Roman numerals to refer to these scale degrees. Therefore, we can refer to these three degrees of the scale as I, IV, and V.
Once we build a chord on these degrees, we have the following:
C Major, F Major, and G Major (illustrated below)
The key furthest to the left in each of these chords is the name of the chord. We call this the Root of the chord.
These three chords, the I chord, IV chord, and V chord, form the “backbone” of the key of C Major. You will notice that if you actually play all these chords at the same time (not practical), you are playing all the members of this scale.
The I, IV, and V chords are known as the primary chords, or primary triads, of the key (a triad is a chord that consists of three notes).
These Primary Chords Serve As Your Foundation
The great news? Once you can play these three chords, you can play a lot of songs! That’s right… countless tunes include just these three chords. Here’s even more good news: all the other chords you will learn have their basic foundation in these three chords. Once you have a handle on these three, you are actually in a much better position than you might currently imagine.
Okay, since you know that there certainly is value in knowing this chord “trio,” let’s not put it off any longer. It’s time to play them!
Free Video Shows You How To Play These Chords And More
Since these three chords are primary, they are more apt to be used in most songs. A person trained to play by ear automatically listens for the existence of these chords. So, by making it a priority to familiarize yourself with them, you’re doing a world of good for your musicianship.
Keep It Fun
You’re on your way, so have fun mastering these major triads! By the way, if you ever have a question, feel free to send it my way. I would love to hear from you.
I want to put it on the table right away so there is no misunderstanding. It is not my intention to minimize the benefits of reading music. The ability to read music opens you to an entire world of wonderful possibilities.
That said, let’s be real. Based on my over four decades of teaching people, I know for a fact that there are lots of people out there who never even gave themselves permission to enjoy themselves tickling those ivories because they saw “the need to read” as an obstacle to overcome. They let that stop them from having fun getting involved with what could be an absolutely terrific, fulfilling hobby. I also think it’s accurate to say that most of these people are not aware that some of the most outstanding musicians of our time never learned to read music.
When an adult with absolutely no experience enters my studio, getting them to learn how to read music is the least of my concerns for the time being. The main goal is to get that individual to express himself or herself in a musical way as soon as reasonably possible. Most of the time, within about 20 minutes, these people become intrigued by the possibilities in front of them.
Expressing Yourself Is Natural
Remember this: you expressed yourself verbally before you could read or write your language. When you were hungry, you learned quickly how to cry for food. When you were thirsty, your instincts made it easy to get your message across.
Making music can be the same way… and it ought to be.
A most delightful way to enjoy quick results at the piano or keyboard is to explore your harmonic possibilities. Harmony can be simply defined as two or more notes played together that sound good. A chord can be easily defined as harmony that consists of three or more notes played together that sound good.
So, friend, if you want to start enjoying yourself at the piano without knowing how to read a note of music, start having fun learning chords. Chords are where it’s at!
A Quick Way To Have Fun With Chords At The Piano
I put together a very informal, easy-to-understand video and guidebook that makes learning your basic chords so easy, it’s almost funny. It doesn’t require shipping. As with everything in our online store, you can gain instant access to it. It’s called Piano Chords 101 and you can click here to start having fun with playing chords right away. Yes, I mean within minutes, not hours.
You see, there is something about even just playing chords on the piano that is satisfying. I believe that we were put on this planet to live in harmony. So it makes sense that producing harmony is a very natural, rewarding experience.
Sure, once you learn those chords, you’ll soon be in touch with creative things you can do with them. Actually, that video described above will get you started playing chords in a creative way. There is no time like the present to begin making music… let that time be now.
If you have followed this mini-series in sequence, you used Lessons #1 and #2 to become acquainted with three specific chord structures referred to as voicings. You are playing these voicings with your left hand.
In addition, you are playing these blues piano chord voicings in the context of a very specific chord progression. This chord progression consists of 12 measures. Throughout time, this 12-measure chord progression has been commonly referred to as the basic 12-bar blues form.
The terms we have assigned to the various elements of the blues might be called a kind of “theory” in itself. However, we haven’t really talked about any particular aspect of music theory that you need to make an effort to remember. The real value is in the doing rather than remembering. From the beginning, it has been our intention to focus on getting you in the act of playing without getting bombarded with theoretical stuff to remember.
You Are Playing “Pro” Chord Voicings
In Lesson #3, we took a good look and listen to how these chord voicings are used in actual playing situations. These two “musical giants” made terrific music as they engaged in a wonderful dual performance of the blues. A key point here is that much of what each performer was playing with the fingers of his left hand is exactly what we have been focusing on.
These three voicings that you have been familiarizing yourself with are often referred to as “stock” voicings, meaning they are commonly used by the pros time and time again. Like stock, they are always available to be “pulled off the shelf” when needed. In other words, you will use these voicings so many times that you’ll be able to immediately play them without thinking about them!
Repetition Breeds Familiarity
Yes, again, you want to be able to play them without thinking about them. This is a good reason that we have not been in any great hurry to go beyond getting quite used to having fun with playing these three left-hand voicings again and again. In addition, playing them in the context of the 12-bar blues will also become second nature to you.
It will serve you well to embrace the truth that it’s not how much you know but what you do with what you know that leads to wonderful results.
A Tiny Little Adjustment
We are still going to take things slowly at this point. However, we can “get our feet wet” with taking things one step further. I would like you to consider exercising that imagination of yours.
You see, rather than dictate what your next steps are (as in telling you what to play), I would like you to make some fun choices of your own. It’s really very important that you don’t judge your performance at all. Just allow yourself to explore, okay?
We will get to that in a few moments. Below, I have provided a short keyboard animation. The animation demonstrates my playing of this 12-bar blues form utilizing the three blues chord voicings that we have been playing with my left hand. While I am doing this, I am also playing a right-hand improvisation.
For the first few times viewing and listening to this, place your focus again on what is being played with the left hand. Of course, the three lowest keys being played are these voicings. See them and hear them in the context of the 12-bar blues form.
I would like to point out one tiny little difference in this 12-bar blues chord progression that I am playing. As you watch and listen, do you notice that I interrupted the first four measures of the C9 chord by playing the F13 once in measure #2?
Compare this with the 12-bar blues form we played in Lesson #2:
|| C9 | F13 | C9 | C9|
| F13 | F13 | C9 | C9 |
| G13 | F13 | C9 | C9 ||
This isn’t anything intimidating at all since we are not playing anything new. We are just inserting the F13 that we already know in measure two to replace the C9.
What do we accomplish by doing this?
Up to now, as you played through the first four measures of the blues form, perhaps you have already felt as though playing that C9 chord voicing for four measures in a row seemed a little more repetitious than you would have liked.
If so, your feelings have been shared with many blues professionals throughout the decades.
This four-measure phrase really invites this temporary interruption. It really keeps the momentum going. Please take this opportunity to listen once again to Oscar Peterson and Count Basie playing the blues and you will notice that they are indeed playing that F13 in measure #2 also!
You’ll hear this particular version of 12-bar blues form played often as you listen to more and more blues players. Is this always the case? No. It’s a choice and dependent on the choice of the composer or performer.
The Right-Hand Dance
Okay, let’s get back to your having fun with making some choices. I want you to approach this with an accepting attitude. Make it fun…
Let’s take a look at what’s going on with that right hand in the video animation above. You’ve noticed that, as the left hand plays those voicings you have familiarized yourself with, the right hand is playing something a little “bluesy.”
Go ahead and take specific notice to just a tiny segment of that… any little part of it. Just choose a few notes that appeal to you… maybe two, three, or four. While at your piano or keyboard, play those few notes with your right hand as you play through the 12-bar blues chord progression. Even as you change the voicings with your left hand, it’s okay to keep playing those few notes with your right.
Take your time with this. Remember, having fun applying yourself to what’s being described is where the value exists for you.
What are you noticing? There is no wrong answer to this. Your perception is correct and just fine. Just play and listen. The idea is to play, listen, and have fun with this. Perhaps you are noticing that when you play the right-hand notes while changing chord voicings with the left hand, you experience something quite interesting. You are putting yourself in touch with some different sound textures. This is a significant part of playing the blues!
Keep playing. Don’t think. Just do.
The video above is actually the beginning excerpt of a special half-hour session that I created. If you would like to experience the entire video, you can gain instant access to it by visiting here. I think you’ll experience something positive as you follow along with it.
Keep on playing through the 12-bar blues form with those left-hand voicings as you allow your right hand to explore a little. Don’t judge. Just play… listen… smile… play… listen… smile… enjoy… soak it up… love it… appreciate every sound that your fingertips produce. You’re doing great!
As you continue, you will be inspired to make some different choices for those right-hand fingers to play. Follow through as we have described. Enjoy the choices you make. Make some more! You are beginning to improvise!
Are you a piano beginner who likes the blues? Listening to blues music is undoubtedly a wonderful thing. Actually playing blues music is even more fun!
If you have little or no experience at those keys, my guess is that your reaction to just the idea of playing the blues is one of doubt. Am I right? Sometimes I’m wrong.
Well, okay, whether you believe you’re capable of it or not, suspend those doubts for just a little while and grab hold of these simple concepts.
There are three basic chords to the blues and they are all 7th chords. If we’re playing a C Blues, then those chords are:
C7
F7
G7
That’s it!
Alright, I admit it. That was theory. So you don’t have to pay attention to it right now.
Again, my intention here isn’t to get you to understand what you will be doing… just to DO IT! There’s plenty of time for you to learn about the “why’s” but the fun of it all is in the playing of it. Remember, you were able to speak before you could spell any of those words. You just know how to produce the sounds and you did it (from “goo-goo-gaa-gaa” to “I’m hungry!”)
Let’s Play Some Chord Voicings
So that’s what we’re doing here. The chords mentioned above don’t sound all that fantastic if played in a very basic so, as a beginner, you’re being introduced to the “pro” way of playing them. These are called “chord voicings” but don’t concern yourself with that now. JUST DO.
Simply look at the three images below and place the pinkie,index finger, and thumbof your left hand on the keys you see highlighted, okay?
Position #1
Position #2
Position #3
All you need to do is get used to playing those three structures with your left hand. Play Position #1, then Position #2, then Position #3.
Once you are comfortable with this, practice these 3 chord structures in this order:
Play Position #1
Play Position #2
Play Position #1 again
Play Position #3
Play Position #2
Play Position #1 again
Do this over and over again. Just get used to doing this. That’s all you need to be getting out of this lesson. Copy what you see in those illustrations by playing them on your piano or keyboard. Here’s a quick flick of my playing them. In this video, I mention the names of the keys but that’s not important to you right now if you don’t know them (no theory necessary, remember?):
When you are comfortable playing these structures, you have already accomplished a lot! So, A +++++ to you.
I’m wondering if what you’re hearing is familiar to you. Is it? Would you do me a favor? Please use the information on the contact page to email me your experience with this. I want your input. Are you having a challenge with these positions? Did it come easy for you? Are you feeling comfortable playing them in the order shown above? When you email me, please include “Blues Piano Lesson” in the subject area.
I’m interested in knowing so do connect with me. The next part of this non-theory blues piano lesson will follow.
Contrary to what is normally introduced to a new student during a first piano lesson, my choice is to immediately expose that individual to the diatonic chord system. Why? Because once understood even to a small degree, anyone can sound good at the piano almost immediately.
I will generally introduce that person to the basic triads (three-note chords) in the key of C Major. Following that, we look at these same chords arranged in fifth intervals. Once a student’s two hands can somewhat comfortably play these chords around the diatonic circle of fifths, he or she experiences a sort of mystified delight that says, “Wow, I didn’t know I could be doing this so quickly!” It’s no surprise that this new student’s curiosity is aroused and he or she has a genuine desire to explore further.
It’s A Natural Musical Law
Gravity is a basic law that we all have to live by. If you hold a ball in mid-air and let go, the ball must fall downward. It’s a natural force. In a somewhat similar way, music has a “gravitational force.” I’m referring to the natural progression of chords that is most pleasing to the ear. Although there are many directions a chord can move, the strongest root motion that exists in music is “down a fifth.” As an example, a C Major chord is likely to be followed by an F chord of some kind more than any other chord (Going downward, C B A G F is a fifth since five letters are included). Is this always the case? Of course not. However, it is the strongest and most natural tendency.
Playing With Gravity
One of the most interesting harmonic characteristics of music is how a composer or improviser will play games with this “law of musical gravity” by defying it and returning to it. For example, that same C Major chord can move upward to a D minor chord… or to an E minor chord… or any other chord. So, this “musical gravity” is played with (or somewhat defied) but it usually gets revisited. Just take a look at a number of songs in any collection that you might have and look at the last two chords of the song. A good percentage of the time, you will find the second to the last chord of the song progressing down a fifth interval to the final chord of the song (which is usually the chord assuming the same name of the key the song is in). For example, if the song is in the key of C Major, the last two chords are often a G chord or some kind followed by a C chord.
Diatonic Chords
Let’s take a look at the key of C Major. Our scale consists of:
C D E F G A B C
If we assign each of these letters as being a “root” of a chord (or name of a chord), we will have a C chord, D chord, E chord, F chord, G chord, A chord, and a B chord.
We can easily build a chord on each of these roots by simply playing the root and two more tones that are each a third away from the previous letter. In simple terms, if you play C, then skip D and play E, then skip F and play G, you are playing C, E, G which is a C major chord. In effect, you are starting with the name of the chord and then playing “every other letter.”
If we took this a step further, we could add the B to the chord, creating a Cmaj7 chord (C, E, G, B).
We won’t get into all the theory here, but we could apply this same system to all the other notes in our C Major scale:
C E G B
D F A C
E G B D
F A C E
G B D F
A C E G
B D F A
All these chords are in the key or C Major because they are derived from the scale of C Major and ONLY notes from the C Major scale have been used… that’s what we mean by diatonic.
You will note that the roots of the above chords simply follow the order of the letter of the scale (C, D, E, F, G, A, B).
Let’s Put Them In A Circle of 5ths
However, if we start with the C chord and “move down a fifth,” we arrive at an F (like we did earlier). Taking it further, that F moves down a fifth to a B… then we move to E… etc.
Then this order of our new arrangement would look like this:
C E G B
F A C E
B D F A
E G B D
A C E G
D F A C
G B D F
Yes, we are playing the same chords but each chord “moves down a fifth” to the next.
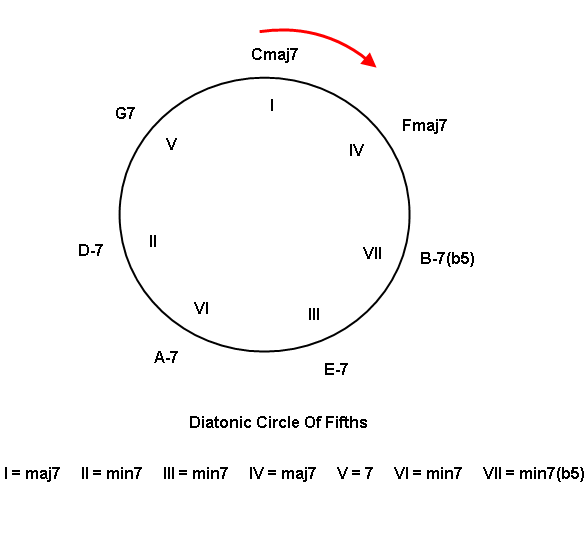
Let’s illustrate this arrangement in the form of a circle:
[You will often see this diatonic circle of fifths presented going in a counterclockwise direction instead. However, the root motion is still “down five.”]
You will notice that Roman numerals are used in the illustration to designate a chord built on the first letter of the scale (I), fourth letter of the scale (IV), etc. It is common for Roman numerals to be used when discussing chord functionality in music.
Let’s Hear This Diatonic Circle Of 5ths
This short excerpt from Chord Progressions And How They Work demonstrates how this progression of chords sounds so natural. This movement of fifths is quite appealing. Let it also be noted that no song was in mind while playing this. This was just a simple improvisation around the diatonic circle of fifths. That’s one of the terrific things about familiarizing yourself with this circle in the early stages of learning. For one, you are really getting a handle on how music works. Also, you have a guide that you can use to play in a way that sounds terrific instantly!
Gain Instant Access To:
Chord Progressions & How They Work Video Session
Just $10
(access will be sent to your email address)
Undertanding This = Musical Mastery
You see, when you are completely aware of the scale or key that your music is centered on, you are in command, whether that be as an improviser or a composer. Mastering the diatonic circle of 5ths is likely to inspire you to both improvise and compose. We have just taken a look at the key of C Major. However, you will want to eventually explore this circle in all your keys. talk about musical confidence!
Playing Music By Ear
Would you like to master the art of playing by ear? Then you’ve just been handed the ticket! By having your antennae set to hear chords progressing around this circle, you will amaze yourself! Friend, your entire musical world will open wide once you tune into this.
Just a note: if you happen to take advantage of that video session, and your watching and listening leads you to having some questions, I would love to hear from you. I have a deep sense of appreciation for your wanting to really grasp this.
We are going to take a look at a chord voicing that you really ought to know if you would like to add some dimension to those standard tunes. Actually, I’ve had my private students apply this particular voicing to every chord in a ballad such as Erroll Garner’s Misty because it sounds great. If you use just this one chord voicing throughout a ballad, you will indeed sound “pro.” If you are a more advanced player, you’ll want to use it in conjunction with others, of course.
Your familiarity with 7th chords is rather essential to take advantage of this. If you are not at that point yet, let this serve as some inspiration to want to get a handle on some of those 7th chords!
Okay, this same formula applies to all your 7th chords, so we’ll use Cmaj7 for our example. Let’s take a look at what a Cmaj7 looks like in its basic root position:
This chord is also said to be in closed position since all the chord tones are as close to each other as they can be (we’re about to change that).
This chord certainly sounds nice just as it is. However, as you will notice in the chord video, making one subtle change to this chord can make a world of difference.
One Subtle Change Is All it Takes
If we take the 3rd of the chord (in this case, E) and simply play it one octave higher instead, our result is still Cmaj7, of course. However, we are now playing a Cmaj7 in open position. Yes, we have “opened” the chord up since not every chord tone is as close to each other as possible (the E in between the C and G is no longer being played). Play this chord and listen:
The sound texture of this new chord structure is much different, yes? By the way, when we rearrange tones of a chord in this fashion, we are “voicing” the chord. The same basic chord is being played but it is restructured a bit. The topic of chord voicings will be acknowledged more and more on this site.
Actual Application
Below you can watch and listen to a few minutes of a video session that I had fun with as I demonstrated different techniques within the context of Duke Ellington’s Don’t Get Around Much Anymore. You can skip to 2:00 on the counter if you like. If you’re interested in the full session, you can visit here. In this particular excerpt, we are demonstrating the use of this chord voicing described above:
I cannot emphasize enough the value of applying this chord voicing formula (1-5-7-3) to each and every 7th chord you know and using it within the context of your favorite songs. You will reap the benefits for a long time to come!
In one form or another, a common question I’ve been asked by many pianists who aspire to become comfortable with playing from lead sheets has been, “What do I do with that left hand?”
Many of these people know how to play the chords that are asked for in the music but feel limited with their capacity to make them sound like anything to talk about. In other words, they might be able to comfortably play a chord like Gmaj7 in its basic form as shown here:
but when it comes to actually incorporating that chord into a ballad, they feel at a loss for ideas. Does that sound familiar?
The Mistake Most Piano Beginners Make
Okay, let me say it straight:
Most people who find themselves in this situation are overthinking about what they should be doing.
You see, it’s really easy to be dazzled by the many chords and jazz piano voicings that the pros play when performing these standard songs. It’s quite another to feel overwhelmed by thinking that you need to know them all in order to sound “pro.”
I’m all for expanding your chord voicing repertoire. actually, I created a 25-lesson program devoted to that. After all, the more colors an artist has on his or her palette, the more choices there are with painting a picture. However, on that same note (!), I will say that a truly creative artist would be able to paint a beautiful masterpiece with just three basic colors like red, blue, and green.
The Real Key To Sounding “Pro”
It’s not WHAT colors you use but HOW you use them. This applies equally to the harmonic colors of music. Please don’t forget this. It is so crucial to the development of your musical artistry.
It’s not uncommon for an individual to approach me for lessons in my studio who has a handle on playing those basic chords and is eager to expand on his/her chord voicing and improvisation skills. However, that person has not displayed any competency with using the tools they know in an artistic manner. The most important point I strive to help this person understand is that the ability to play artistically starts right from the beginning.
You don’t have to wait until you know a massive vocabulary in order to sound articulate, do you? Of course not. Well, the same is true when it comes to performing music. You don’t have to wait until you know a massive chord or voicing vocabulary in order to sound artistic.
Remember: “artistic” does not necessarily mean “fancy.”
You can take that to the bank. If you want to sound “pro,” then practice sounding “pro” with what you already know. I have so much to say about this to my private students. I don’t think a day goes by in the studio when this matter isn’t brought to someone’s attention. I’ll very likely be talking more about it in upcoming writings here, too.
For now, remember, it’s not WHAT you say but HOW you say it.
Consider the other aspects of performing besides fancy chords that come into play when putting a song across: dynamics (volume contrasts), piano keyboard range used, and more.
A Simple “Pro” Left Hand Technique You’ll Want To Own
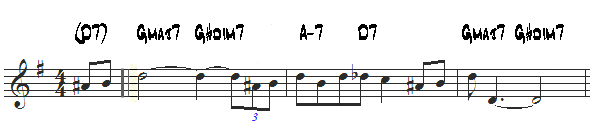
In this video below, which is just the first few minutes of a one-hour session I created called Sneak Peeks 2, four basic chords are being used: Gmaj7, G#dim7, Amin7, and D7. Since this is the very beginning of the video lesson, you may want to skip right to 1:30 on the counter when we actually start this demonstration:
You’ll notice that the left hand is alternating between playing the “shell,” which is the 1 and 7 of the chord, and playing the full chord. You see, this might be equated to an artist lightly stroking the brush on the canvas with a blue and then stroking a little more heavily with brush for different textural effects.
For your reference, here is the lead sheet excerpt Ted Koehler’s and Harold Arlen’s Stormy Weather being used for this demonstration:
Use It To The Point Of Mastery
This simple technique can be applied to virtually any ballad that you know or will learn. Remember to keep the melody in the spotlight and allow those left- hand bass notes and chords (and shells) to just be there without much emphasis. If you remain sensitive to this concept in your playing, you can perform any ballad in a way that really displays to the listener that you are an artist at those keys… because you are!
So many people who arrive at this site have some curiosity about playing piano yet have absolutely no experience whatsoever. If that’s you, let me tell you that you are here for a reason! If you’ve never played piano before or your experience has been somewhat limited to tickling a few notes, then stay with me.
Things are about to change for you beginning today. I put together a video lesson for you that will have you playing the piano and creating some pretty fantastic sounds immediately.
Are you with me?
This is going to be easy. Most people who sit down with a piano teacher for the first time don’t get exposed to this kind of a lesson right away (if ever). You see, when it comes to keeping your motivation up for learning, you’ve got to experience some results. Does this make sense? I mean, really, you want some kind of return for your investment of time and money.
Just A Buck!
Okay, as far as your monetary investment, the price of this lesson has been reduced significantly. Your cost… how does $1 sound? That’s all you’ll invest in this video session. It comes to you as an .mp4 file so that you can either watch it online or download it to your device like an iPad or anything you like.
Now, as far as your investment in time is concerned, this won’t take much. Just have some curiosity, a desire to have some fun, maintain a sense of humor, and this will be fun for you. You’ll do this on your own time at your own pace. The thing to understand here is this: with what you learn in these 20 minutes, you’ll have enough to start having fun and sounding good!
This Works
You see, this has to work for you. Why? Because, you’ll be sounding good quickly… plain and simple. The reason is that you’ll be applying all the elements of music to that piano or keyboard of yours instantly. You don’t need to be playing familiar songs on the piano to sound great. As a matter of fact, the strategy you’ll be learning here will equip you to create some improvisations of your own that let others in the room know that you can play! Before the twenty-minute session is over, you’ll be employing melodic sounds using harmony and rhythm. When you combine those three elements in a way that makes sense, it’s a guaranteed win.
You Don’t Need To Know How To Read Music
You won’t know how to read a note of music for this. You don’t even have to know the names of the keys on the piano (we’ll mention one). Are you starting to see that this just might be the start you need? Believe me… you have what it takes.
A Super Start For You
It’s my hope that your experience with this video session will supply you with enough “spark” to want to continue your journey. Also, if this is your very first piano lesson, you’ll be playing chords on the piano from the start. Did you know that many experienced players often don’t even get this kind of training? It’s true. I’ve had classically trained pianists come to my studio with an excess of 10 years of lessons who wished they had previously learned about chords and how to use them. It’s all in who you connect with. They got some excellent lessons but not the creative kind that provided them with the confidence to express themselves freely.
Here’s the beginning few moments of the video:
Let’s Begin!
Okay, this is about YOU. So, let’s begin, shall we? Just visit here so we can get started on our journey. Follow along at your own pace, pausing the video as you please. Watch… watch again… you’re about to see how easy this really is. Grab a favorite beverage, relax, and get ready to be playing piano in way less than twenty minutes. Enjoy!
Blues Piano For Beginners Mini-Course
Love The Blues? Are you a beginner? Sign up for this FREE mini-course Blues Piano For Beginners and start playing blues piano right away!

 I want to put it on the table right away so there is no misunderstanding. It is not my intention to minimize the benefits of reading music. The ability to read music opens you to an entire world of wonderful possibilities.
 Our Blues Piano Journey Continues
 Are you a piano beginner who likes the blues? Listening to blues music is undoubtedly a wonderful thing. Actually playing blues music is even more fun!


 We are going to take a look at a chord

 So What Do I Do With That Left Hand?
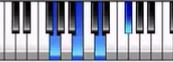
 Attention: Beginners!